Sox For Horses is glad to help if you have questions. If you do not know how to sew, the following instructions will guide someone that does through making them for you. We also make them. Email us if you are interested in our making them for your horse at info@soxforhorses.com or if you want to talk about making them yourself.
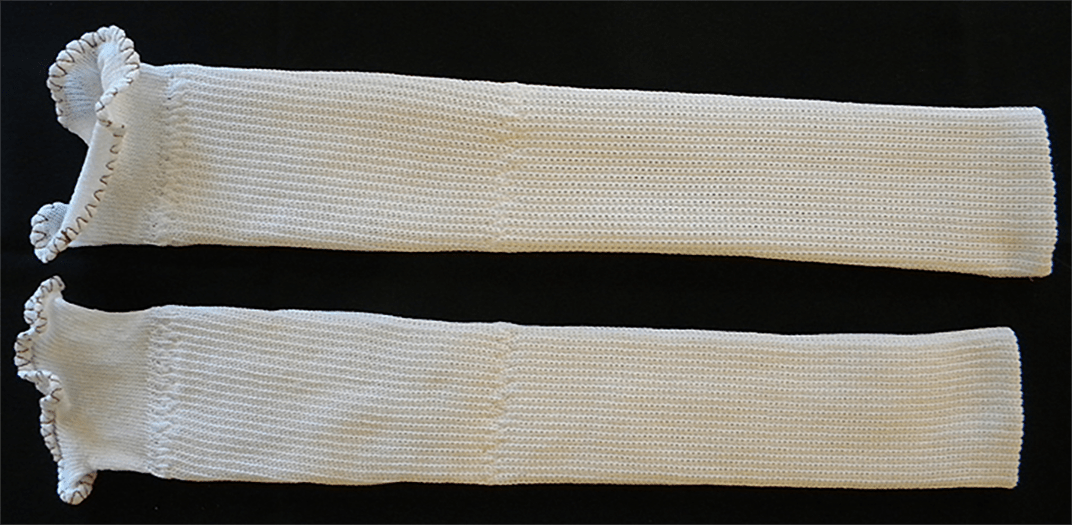
The following is an example of a Pull-Over Sox for a horse with hoof dimensions of 8.5” L and 6.5” W. This person bought a set of 4 Silver Whinnys. Out of 4 socks, she will be able to make 3 custom Pull-Over Sox. If your horse is similar in hoof size then this guide will work. Larger horses may take 1.5 sox to make 1 Pull-Over. Almost all require a little further adjustment but we can help with that over the phone.
We invite you to call us and ask for guidance. We do not charge to help with tech support so be free to bother us. We are glad to help you get them right. It is helpful if you have a surger. If you do not, you can use a zigzag stitch on your sewing machine but a surger works best.
BEGIN
Make sure all of your socks are laying flat and the inside and outside of the socks are not wrinkled. You can put your hand inside a sock, spread out your fingers and pull it gently out, smoothing the sock while holding the foot of the sock. This align and smooth the inside and outside of the sock. Don’t stretch them. Just smooth them out.
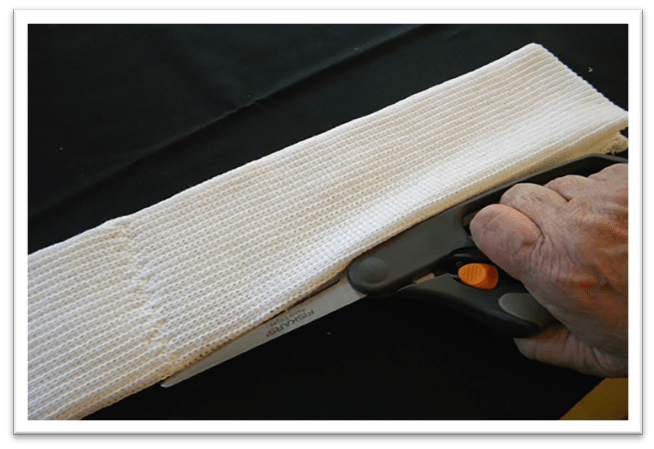
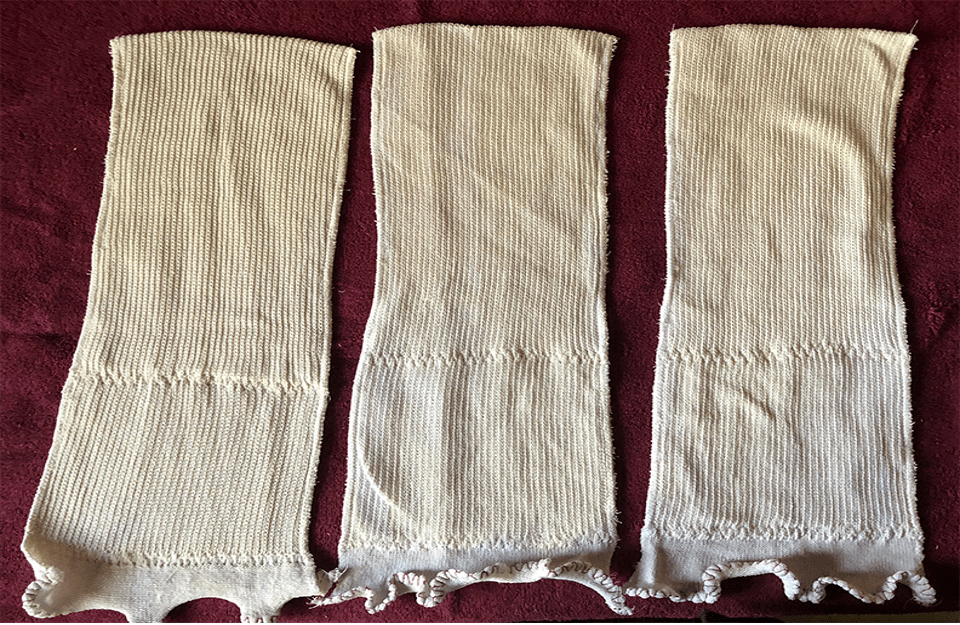
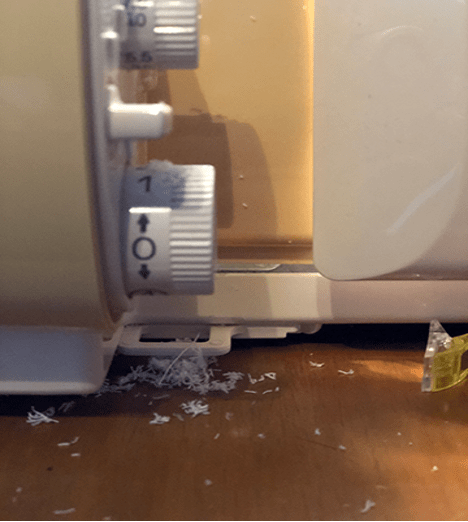
Cut 4 socks to open them up
The 4th sock will be used for the needed additional ‘width panels’. When cutting, choose a “gully” between the rows of knit and follow it straight down the length of the sock. This way, your cut will be straight
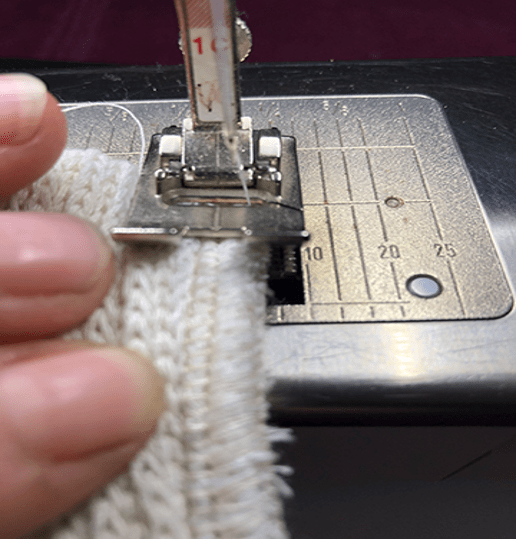
Surge all 4 socks on the raw edges. 3 socks are shown in the photo but surge the raw edges of all 4 socks! Do not pull on the socks as they feed through the surger or sewing machine if you use a zigzag stitch to finish. You do not want to stretch the socks! Let them feed easily through the finishing so that they remain the same resting size before you sewed them.
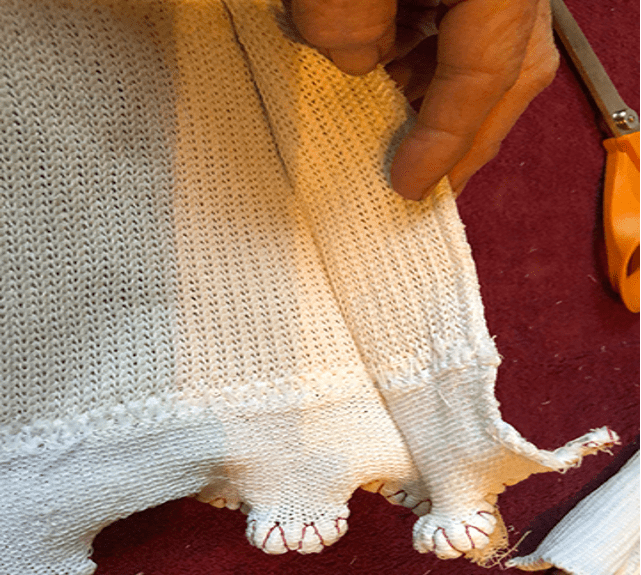
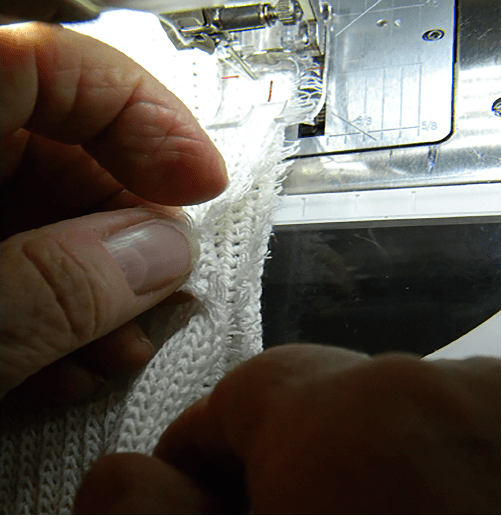 The seamstress is using a sewing machine to zigzag finish the edges. Note how she makes sure she catches both layers of the sock as it feeds through the sewing machine. Make sure both layers of the socks are caught evenly by pinning or clipping them together. I prefer clips.
IMPORTANT: WHEN SURGING DO NOT CUT OFF ANY PART OF THE BOTTOM FINISHING OF THE FOOT. (USUALLY IN RED THREAD) IF YOU CUT OFF FOOT’S WIDTH AS YOU SURGE, THE SOCKS MAY NO LONGER HAVE THE WIDTH TO FIT OVER THE HOOF! PUSH THE SOCK EDGES UP TO THE CUTTER BUT NOT INTO IT. THERE SHOULD BE VERY LITTLE WASTE ‘TRIM’ THAT HAS BEEN CUT OFF.

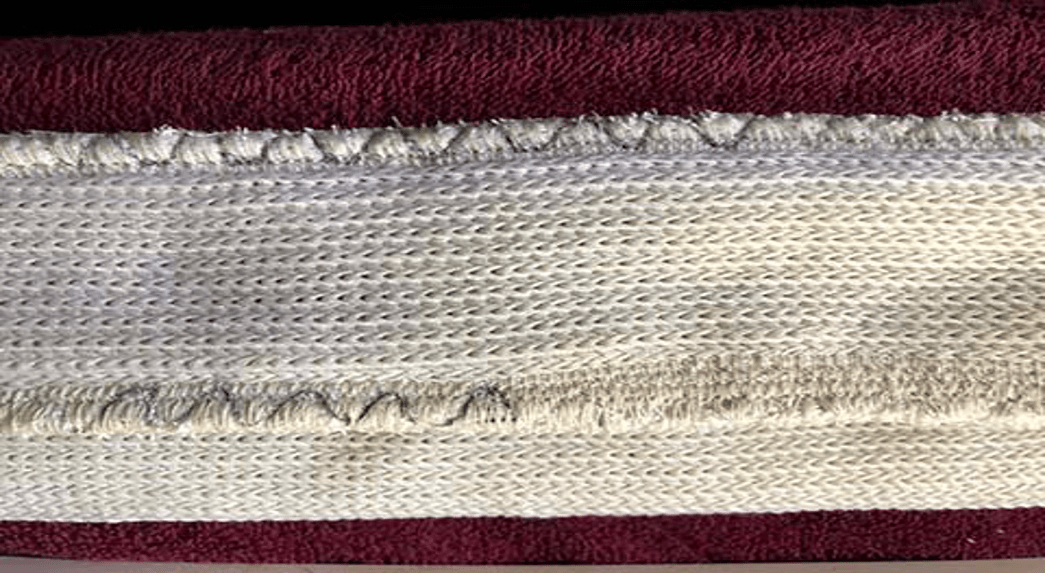
This is how a sock looks that was zigzag finished all the way down to the bottom of the Foot.
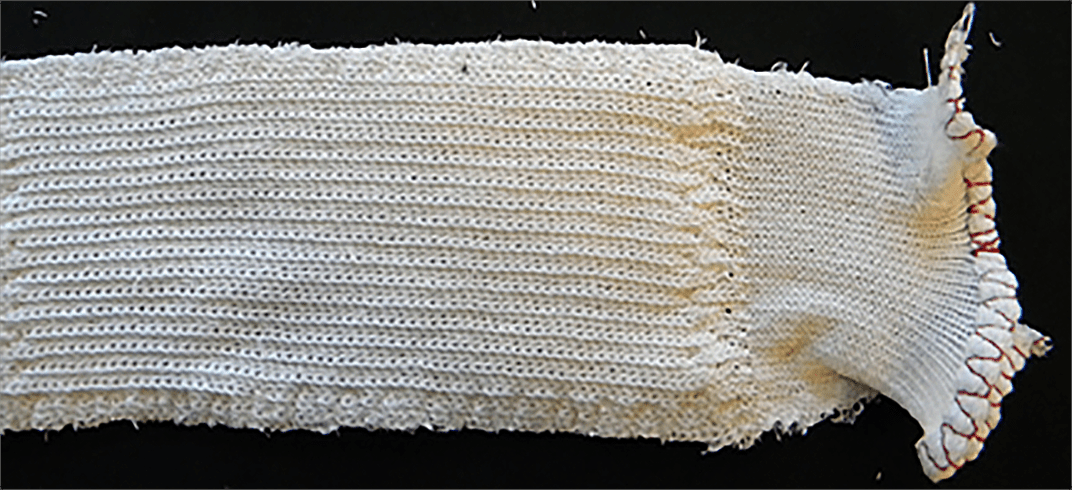 This is how the socks look when finished by a surger. Both methods work and we will show you how to make sure the seams are strong.
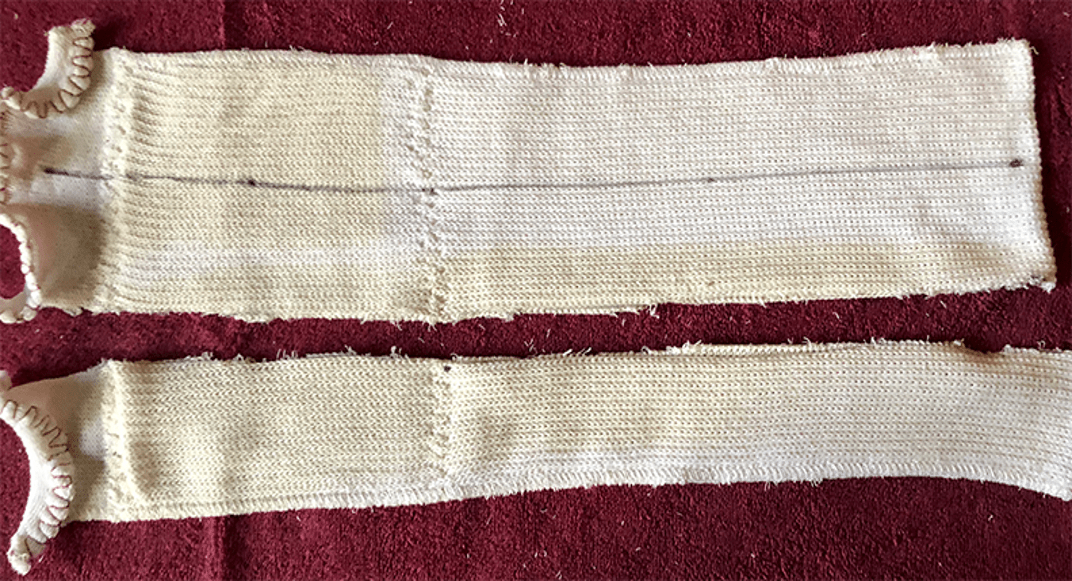
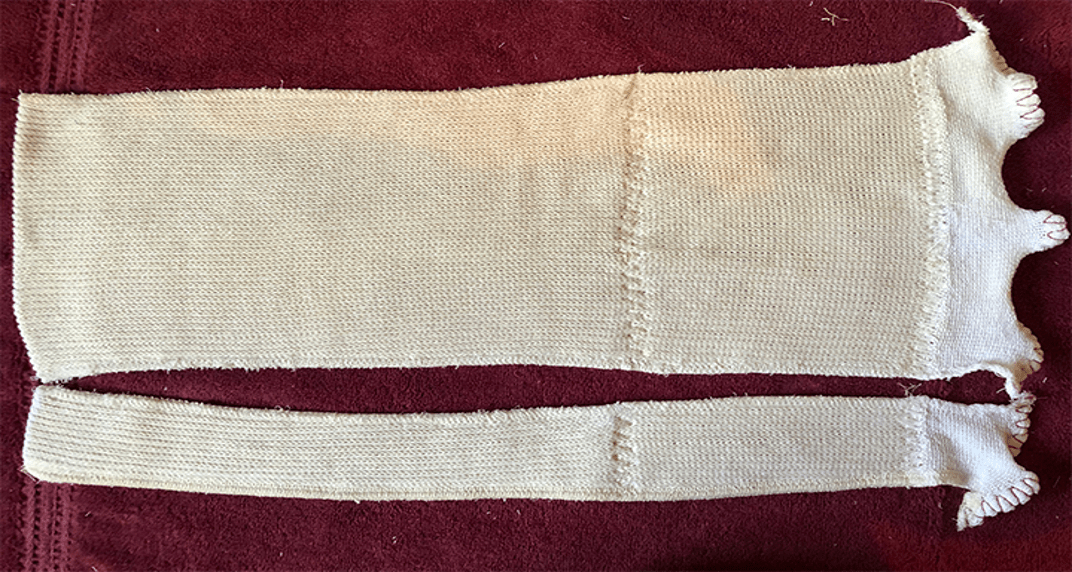
The 4th sock will be cut into 3 equal pieces. Mark your cut lines! There is no room for error if you want to get 3 custom socks out of 4. In this case, with the hoof at 8.5” long and 6.5” wide, a 3rd of a sock will be enough to add in. The width of the sock when cut should be about 6" at the top and as you measure down, will widen to 7” at the bottom so adjust your 3rds appropriately. This sock measured for 2“ wide panels in the top portion and 2.25” width in the lower part of the sock.
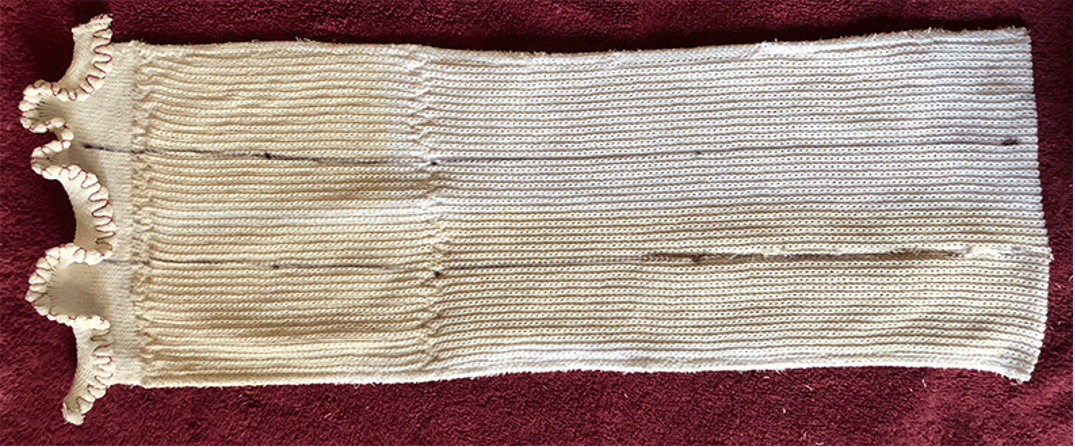
Cut into three pieces.
THE INSIDE OF THE SOCK IS DIFFERENT FROM THE OUTSIDE
It’s always nice if you match the panels correctly but if you err, its not horrible. They just don’t look as nice. I don’t think your horse notices, but lets start with the basics so you sew the panels together correctly and you are happy with how they look.
INSIDE-OUTSIDE OF SOCKS
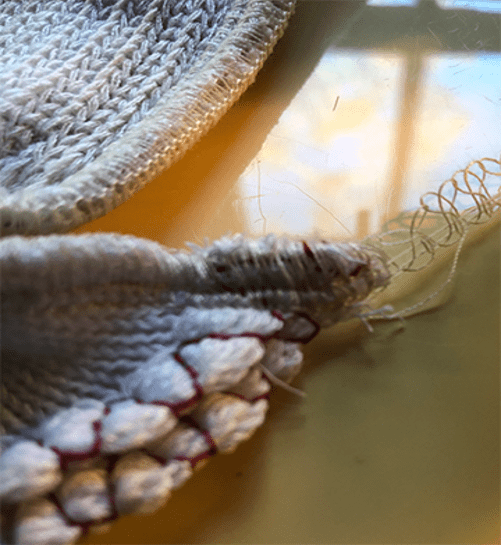
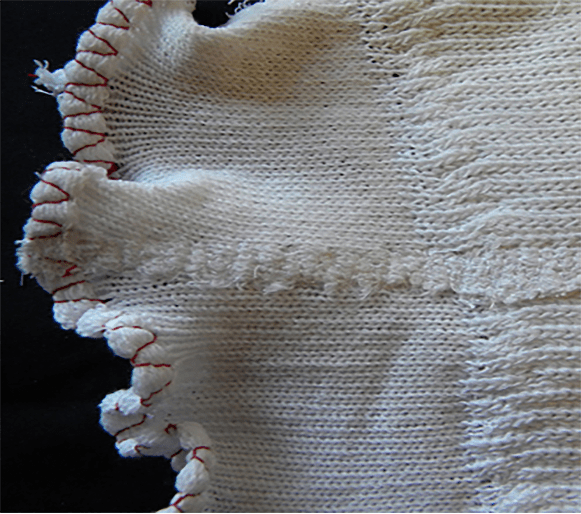 THE FOOT OF THE SOCK: serves to cover the lower pastern and top of the hoof. This is a view of the ‘foot’ on the outside of the sock. Note how smooth the surface.
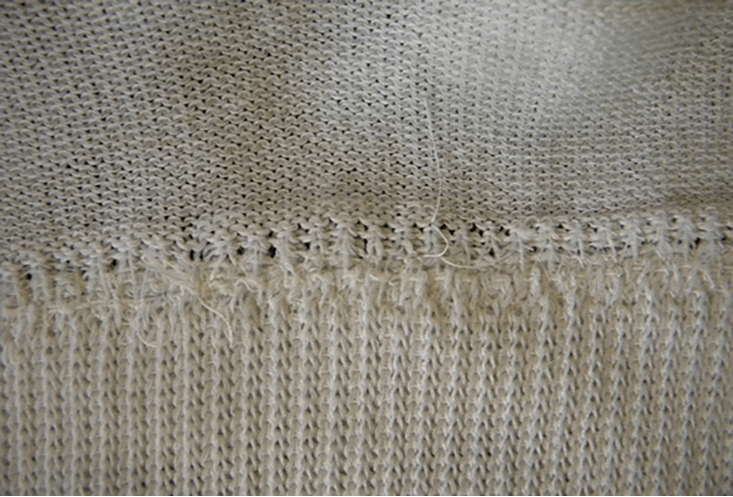 This is how the inside top of the ‘foot’ looks. This stitching holds and rein-forces the two layers of the upper sock togeher. Note that it is not smooth like the outside of the sock.
When piecing panels of sock material together you want to make sure you are matching the inside to the inside or outside to the outsides of the sock.
SEW THE PANELS TOGETHER:
This is easy and this is where fit happens. If you have added too much additional panel, you can go back to the serger and trim it down. You always want to have too much vs too little. Its good to call us before you cut. Most of the time we are starting with 1.5 socks to make 1 custom sock.
You really don’t know for sure until you sew the two pieces together and check the stretch width by laying them on a measuring tape. Also fit is important if you have swelling in any part of the legs that will be covered by the sock. You don’t want them too tight.
It’s easier to tape them to prevent them from sliding down than to make them too small and not fit or be too tight. Again, we invite you to call us or email us to help you fine-tune them. You can do this! Build one sock and try it on your horse. That gives you the opportunity to adjust the one you just made and make sure the following ones fit perfectly. If the sock is too large, cut out one seam, re-surge the edges and take it in appropriately. Not hard to do! You have the advantage we do not. Your horse is there to model them and help you!
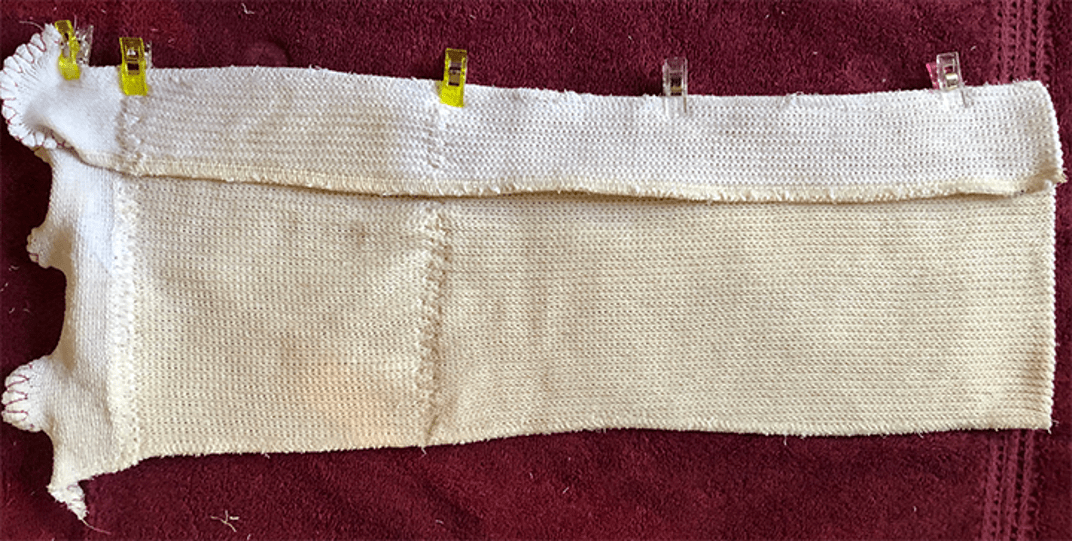
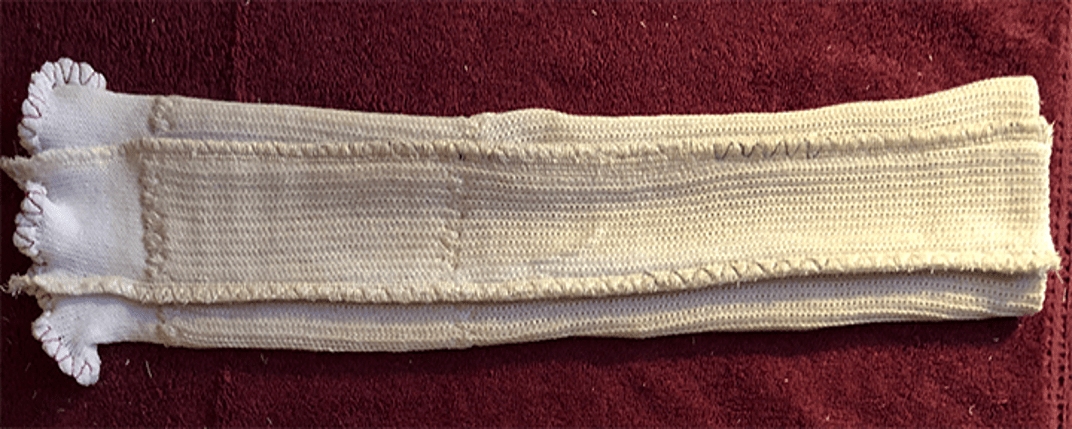
In this photo I have both socks matched up with the inside turned up.
Clip or pin the top, matching all the way down the length of the sock. This is where you get the inside to the inside and outside to the outside. Look closely. The outside of the sock is in view on the small panel. The large panel offers the inside view of the sock. When you sew them together, the seam allowance will always be on the outside of the sock! You want the sock to be smooth against the horse’s leg. Very important!
Surge or zigzag the two panels together.

There is very little trim waste from the knife. I have the socks against the knife but not allowing the knife to cut into the socks.
 When you have finished surging or zigzagging it will look like this on the INSIDE OF THE SOCK. Smooth! No seam allowance on the inside of the sock.
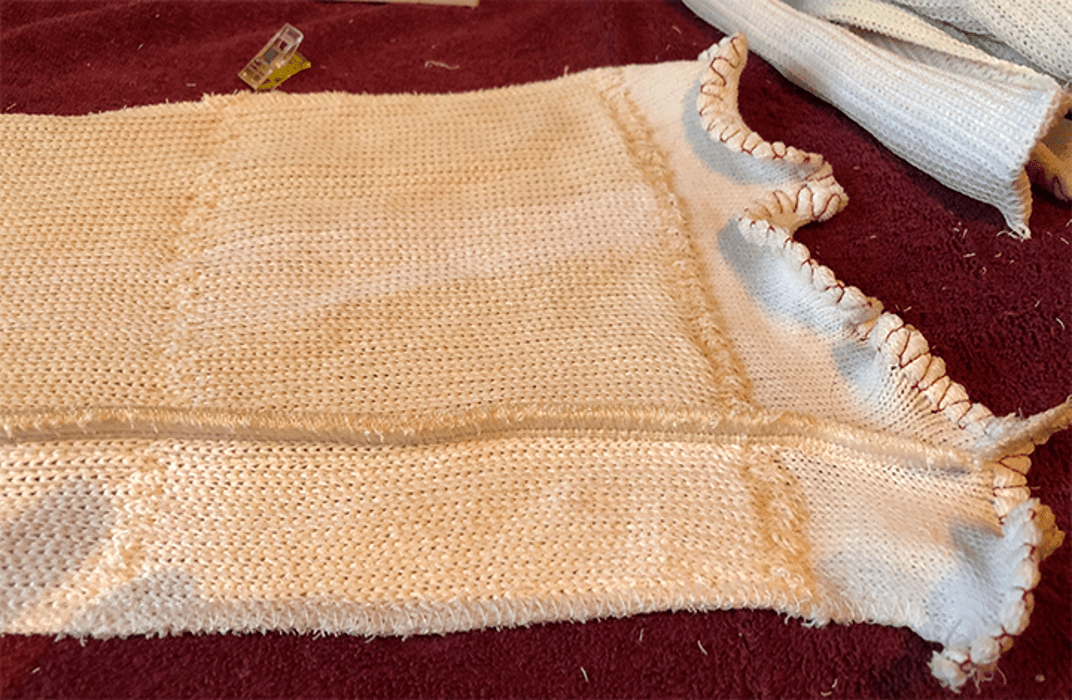
And the outside of the sock has the seam allowance showing.
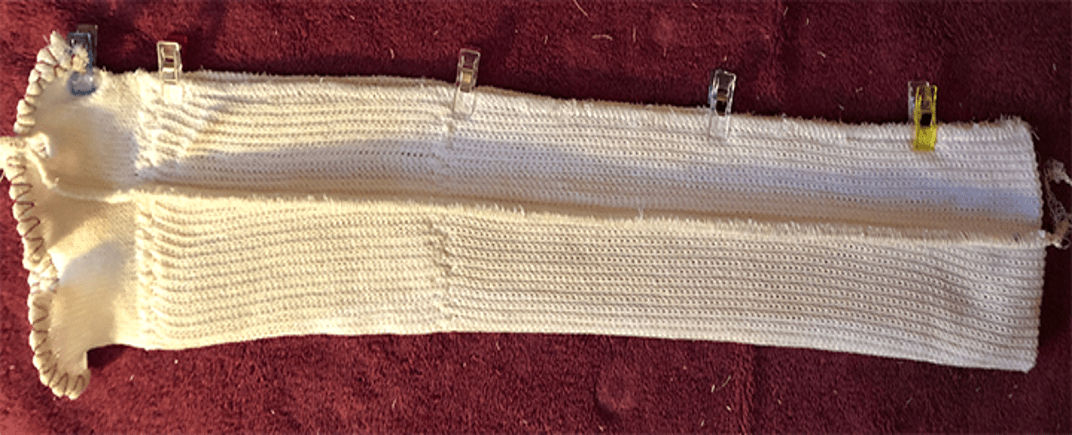
READY TO CLOSE THE SOCK INTO A TUBE! Don’t forget that when you close the sock by surging the other side making it into a tube, check to make sure that the seam allowances will all be on the outside of the sock or you have messed up. That is the one thing that can be a big mistake. If you make it, you will be spending the evening taking out stitching to correct it. The way I make sure I have the seam allowances on the outside of the sock by clipping that seam together. Pin if you wish. But this is the last insurance you have to be sure your seam allowances are on the outside of the socks.
When you have surged/or zigzagged both seams together, you now have a tube. Reinforce those seams. We use a serpentine stitch to do this as it is a formidable stitching and holds well to wear. Most sewing machines have a serpentine stitch.
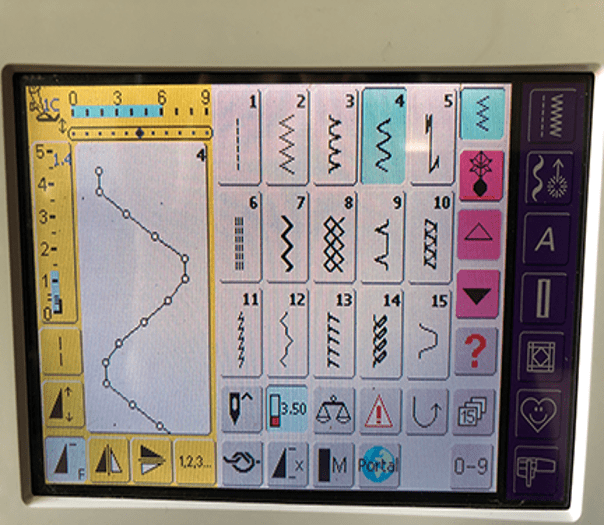 It’s set at about 6mm wide using regular length stitches.
 You only want the serpentine stitch as wide as the surging or the zig-zag. This will add tremendous strength to the seams making them tough enough for horse wear. I let the machine sew in place for a few back and forth cycles to secure the threads at the top and bottom of the sock.
This is what the serpentine stitch looks like when it’s set on top of the zigzag or surging. I’ve drawn along the stitches to show you what it looks like. Sew all the way down on both seams from the top to the bottom of the sock.
You are done!
Now try it on you horse. If it needs adjusting and you need help, call us. Another helpful tip, you can never take in the top of this sock and expect it to fit over the hoof. The whole sock must fit over the hoof or it will not go on! The top can be no smaller than the circumference measurement of the hoof, so don’t get confused and try to make the top smaller. Take your horse’s measurements. We have a Measuring Chart available and can email it to you. We know how to do this, but for you, don’t take chances. Call us. 850-907-5724 or email info@soxforhorses.com.
The following is an example of a Pull-Over Sox for a horse with hoof dimensions of 8.5” L and 6.5” W. This person bought a set of 4 Silver Whinnys. Out of 4 socks, she will be able to make 3 custom Pull-Over Sox. If your horse is similar in hoof size then this guide will work. Larger horses may take 1.5 sox to make 1 Pull-Over. Almost all require a little further adjustment but we can help with that over the phone.
We invite you to call us and ask for guidance. We do not charge to help with tech support so be free to bother us. We are glad to help you get them right. It is helpful if you have a surger. If you do not, you can use a zigzag stitch on your sewing machine but a surger works best.
BEGIN
Make sure all of your socks are laying flat and the inside and outside of the socks are not wrinkled. You can put your hand inside a sock, spread out your fingers and pull it gently out, smoothing the sock while holding the foot of the sock. This align and smooth the inside and outside of the sock. Don’t stretch them. Just smooth them out.
Cut 4 socks to open them up
The 4th sock will be used for the needed additional ‘width panels’. When cutting, choose a “gully” between the rows of knit and follow it straight down the length of the sock. This way, your cut will be straight
Surge all 4 socks on the raw edges. 3 socks are shown in the photo but surge the raw edges of all 4 socks! Do not pull on the socks as they feed through the surger or sewing machine if you use a zigzag stitch to finish. You do not want to stretch the socks! Let them feed easily through the finishing so that they remain the same resting size before you sewed them.
The seamstress is using a sewing machine to zigzag finish the edges. Note how she makes sure she catches both layers of the sock as it feeds through the sewing machine. Make sure both layers of the socks are caught evenly by pinning or clipping them together. I prefer clips. IMPORTANT: WHEN SURGING DO NOT CUT OFF ANY PART OF THE BOTTOM FINISHING OF THE FOOT. (USUALLY IN RED THREAD) IF YOU CUT OFF FOOT’S WIDTH AS YOU SURGE, THE SOCKS MAY NO LONGER HAVE THE WIDTH TO FIT OVER THE HOOF! PUSH THE SOCK EDGES UP TO THE CUTTER BUT NOT INTO IT. THERE SHOULD BE VERY LITTLE WASTE ‘TRIM’ THAT HAS BEEN CUT OFF.
This is how a sock looks that was zigzag finished all the way down to the bottom of the Foot.
This is how the socks look when finished by a surger. Both methods work and we will show you how to make sure the seams are strong. The 4th sock will be cut into 3 equal pieces. Mark your cut lines! There is no room for error if you want to get 3 custom socks out of 4. In this case, with the hoof at 8.5” long and 6.5” wide, a 3rd of a sock will be enough to add in. The width of the sock when cut should be about 6" at the top and as you measure down, will widen to 7” at the bottom so adjust your 3rds appropriately. This sock measured for 2“ wide panels in the top portion and 2.25” width in the lower part of the sock.
Cut into three pieces.
THE INSIDE OF THE SOCK IS DIFFERENT FROM THE OUTSIDE
It’s always nice if you match the panels correctly but if you err, its not horrible. They just don’t look as nice. I don’t think your horse notices, but lets start with the basics so you sew the panels together correctly and you are happy with how they look.
INSIDE-OUTSIDE OF SOCKS
THE FOOT OF THE SOCK: serves to cover the lower pastern and top of the hoof. This is a view of the ‘foot’ on the outside of the sock. Note how smooth the surface. This is how the inside top of the ‘foot’ looks. This stitching holds and rein-forces the two layers of the upper sock togeher. Note that it is not smooth like the outside of the sock. When piecing panels of sock material together you want to make sure you are matching the inside to the inside or outside to the outsides of the sock.
SEW THE PANELS TOGETHER:
This is easy and this is where fit happens. If you have added too much additional panel, you can go back to the serger and trim it down. You always want to have too much vs too little. Its good to call us before you cut. Most of the time we are starting with 1.5 socks to make 1 custom sock.
You really don’t know for sure until you sew the two pieces together and check the stretch width by laying them on a measuring tape. Also fit is important if you have swelling in any part of the legs that will be covered by the sock. You don’t want them too tight.
It’s easier to tape them to prevent them from sliding down than to make them too small and not fit or be too tight. Again, we invite you to call us or email us to help you fine-tune them. You can do this! Build one sock and try it on your horse. That gives you the opportunity to adjust the one you just made and make sure the following ones fit perfectly. If the sock is too large, cut out one seam, re-surge the edges and take it in appropriately. Not hard to do! You have the advantage we do not. Your horse is there to model them and help you!
In this photo I have both socks matched up with the inside turned up.
Clip or pin the top, matching all the way down the length of the sock. This is where you get the inside to the inside and outside to the outside. Look closely. The outside of the sock is in view on the small panel. The large panel offers the inside view of the sock. When you sew them together, the seam allowance will always be on the outside of the sock! You want the sock to be smooth against the horse’s leg. Very important!
Surge or zigzag the two panels together.
There is very little trim waste from the knife. I have the socks against the knife but not allowing the knife to cut into the socks.
When you have finished surging or zigzagging it will look like this on the INSIDE OF THE SOCK. Smooth! No seam allowance on the inside of the sock. And the outside of the sock has the seam allowance showing.
READY TO CLOSE THE SOCK INTO A TUBE! Don’t forget that when you close the sock by surging the other side making it into a tube, check to make sure that the seam allowances will all be on the outside of the sock or you have messed up. That is the one thing that can be a big mistake. If you make it, you will be spending the evening taking out stitching to correct it. The way I make sure I have the seam allowances on the outside of the sock by clipping that seam together. Pin if you wish. But this is the last insurance you have to be sure your seam allowances are on the outside of the socks.
When you have surged/or zigzagged both seams together, you now have a tube. Reinforce those seams. We use a serpentine stitch to do this as it is a formidable stitching and holds well to wear. Most sewing machines have a serpentine stitch.
It’s set at about 6mm wide using regular length stitches. You only want the serpentine stitch as wide as the surging or the zig-zag. This will add tremendous strength to the seams making them tough enough for horse wear. I let the machine sew in place for a few back and forth cycles to secure the threads at the top and bottom of the sock. This is what the serpentine stitch looks like when it’s set on top of the zigzag or surging. I’ve drawn along the stitches to show you what it looks like. Sew all the way down on both seams from the top to the bottom of the sock.
You are done!
Now try it on you horse. If it needs adjusting and you need help, call us. Another helpful tip, you can never take in the top of this sock and expect it to fit over the hoof. The whole sock must fit over the hoof or it will not go on! The top can be no smaller than the circumference measurement of the hoof, so don’t get confused and try to make the top smaller. Take your horse’s measurements. We have a Measuring Chart available and can email it to you. We know how to do this, but for you, don’t take chances. Call us. 850-907-5724 or email info@soxforhorses.com.